Wednesday, November 30, 2005

The Untitled Samurai...

Yesterday I finally finished a piece that took much longer than expected. I had first worked on it in September (or was it even August) and then I got stuck. This is the largest piece that I've ever tried (40"x30") at that point which may have had an impact. When I stopped working on it, it looked like the photo on the left. Then nothing happened for months and I just stared at it on my living room wall every day. I had a few ideas but nothing really concrete. About a week ago I decided to go with gray and blue. I didn't think "sky" but gray with some blue shining out of it. Well, it turned into a sky. But I quite like the result. What do you folks think? (oh, yes, the first photo was actually a bit before I stopped working on the piece -- the green lines were not on there yet)


Saturday, November 26, 2005

Varnishing paintings on burlap

I was wondering for quite a while already whether it's a good idea to varnish my paintings on burlap and how I would varnish them: matt, satin or glossy. The special appeal of those pieces comes from their rough, velvety surface, after all, and they look quite matt, especially those I did with my own oil paints. I just had to try varnishing them, but I didn't want to sacrifice any of my finished pieces for that experiment. Also, I didn't want to wait for half a year before I would see a result (because that's how long you should wait at least before varnishing an oil painting). However, an experiment with acrylic paints using earth tones should be close enough to get the information I wanted. I created a triptych and then varnished the three pieces separately to determine how different they look with the different varnishes.

Overall result: There is much much less of a difference between then three pieces than if they had been on regular (smooth) canvas. Even with the (very) glossy dammar varnish the painting was nowhere close to being as glossy and reflective as you would see on a smooth canvas. Here is a photo of the triptych as a whole (before varnishing)


Now, to show the differences between the results I photographed a corner with two of the pieces next to each other and I also photographed them at an angle against sunlight to check for glare. There is a noticeable difference between matt and glossy, but the differences between matt and satin or satin and glossy are less then you would expect. Also, I noticed that varnishing didn't intensify the colors as much as it would on a smooth canvas. That's at least my observation.

As result I'd say: varnishing on burlap (at least when the burlap is as loosely woven as in this example) doesn't make a huge difference in the look of the piece. I assume it still protects the painting, but I wouldn't be surprised if there was less protection because there is no continuous film covering the piece.


In another experiment I noticed on tighter woven burlap the effects of varnishing are much closer to varnishing on regular canvas. The photo shown below is from painting on burlap where there are no "pores". This piece was sprayed with the "Satin" varnish and it definitely is much more glossy then the other piece I sprayed with Satin varnish:


I used Winsor&Newton spray varnishes: Matt Picture Varnish, Satin Picture Varnish and Dammar varnish. Overall result: "I depends" ;) In general I think I will varnish my burlap pieces and I'll probably use Matt or Satin. Even if the glossy varnish creates only limited glossiness the matt or satin finish just seems to fit better for the burlap pieces that I do.

Mat cutters

I've wanted a mat cutter for quite a while now. But which one to get? Who knows how many mats I really need to cut in the end? do I really need a $200+ piece of equipment? Well, if I indeed cut just like 5+ mats a month the thing quickly will pay for itself. But it's also bulky and it should not get stored upright but flat. That's quite a space commitment. The one I wanted is the Logan simplex 750 which has all the nice features and none of those that ordinary mortals don't need. But in the end, I decided to go with a small Logan Compact 301S because it was on sale and was only $80 ish. Here are my first observations.


  • you can indeed do almost everything with the small one
  • but, yes, the extra money for the extra features is totally worth it. Here is why:
  • production stops are mostly for making several identical cuts in a row, you just cut till the hit the production stop, bingo, easy. But they also make it much easier to make exact cuts and help you avoid over- or under cuts. So they are worth it, I think.
  • the squaring arm. That one is really for sizing mat board. Yes I can cut mat board on the small one, but correctly measuring it is a pain. AND on the 301S that I bought it requires a lot of fiddling to get the mat really correctly aligned (there is nothing to push the mat against to make a perfect 90 deg angle. You have to use a triangle ruler for that. Perfectly doable. Just more work and if you are sloppy like I often am you might end up with less than perfect angles.
  • cutting down standard mat boards to a usable size is sort of doable with the compact cutter. But just "sort of". The board doesn't fit through the cutter, so if you want to - say - cut a mat board in half you are out of luck. Have it halved at the store or buy the more expensive half-boards right away. However, you can cut off 3" off the standard size board, turning it into a 40" x 29" which does fit through the mat cutter. Then you can continue from there. The full size cutters don't require that. But, of course they are an even larger piece of equipment to store (flat). Especially if you have that squaring arm too! And you don't want to have to put that piece on / take it off all the time.
  • The guide rail of higher end cutters has a hinge, the 301s is spring loaded. Again no biggie but for very exact positioning the hinged version is much better, I think (not having tried it).

That much about compact/inexpensive vs. higher end mat cutters. Operating the cutter is a lot of fun. That could become a new hobby (yeah, I know, I desperately need another hobby! NOT!)
I noticed that the blades wear out surprisingly fast. I cut a small pile of 8x10 boards just for experiments and after 3-4 mats I had to rotate the blade. However I should mention that I forgot the backing sheet on three cuts (that happens very easily). That probably dulled the blade prematurely. But blades are inexpensive and it's much cheapter to replace them than to throw out a piece of mat board that was messed up by a bad blade.

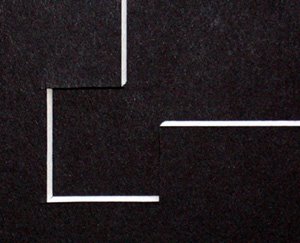
Most standard mats at super easy to do, but when you try to do fancy mats "with cinnamon sprinkles" you might run into little problems like I did. Check out that photo below. Notice something? Oops? Two of the bevels are - well - the wrong way round. It looks quite nice, it just wasn't what I was trying to achieve. There is a trick to do tha, of course (it involves taping a piece of extra mat board to the side of your mat and stuff) but you have to *think* of that first.


I found this book very helpful: M.David Logan: Mat, Mount and Frame it yourself, Watson-Guptill, 2002. Describes pretty much everything you need. Including the trick to avoid those wrong bevels I just talked about. However it's a bit hidden. When they describe how to do a mat with a little title window it says you need to tape on some extra board to do one of the cuts. It does not say why. After the fact I realized that this is the trick I should have used for this mat.

Essentially, standard mat cutters cut a bevel that slopes away from the edge of the mat board. But, the mat guide typically can be set to only 4-5" as most mats are cut narrower than that. Now if you want to make a little title window below the main mat opening, you need to cut a bevel that slopes away from the far edge, which could be 20+" away. You are out of luck with the mat guide. You can take off the guide and use the good-ol' triangule ruler again (if your mat board fits through your mat cutter)... or you use the trick mentioned above and in the book.

Well, you learn something new every day :)

Tuesday, November 22, 2005

Collage on burlap

My mom has a really interesting piece by a chinese artist whose name I forget now. It hangs right over my bed when I visit her in Vienna so I often looked at it and studied it. It is an ink drawing and painting on a paper collage on canvas. And because of the paper collaged to the canvas, the artist could use ink in very much the same way as he would have on regular paper. But it's also a painting. OK, I know this probably doesn't explain the piece well, but the point is that I always wanted to try a collage on fabric as well. And recently I did.

Instead of canvas I used burlp because I like the coarse texture. To make things simple, I decided to do the collage just with acrylic emulsion (not with rice paste that was probably used on the other piece). Also I wanted to build up a picture just through collage and the texture of the fabric. The first of these is pretty small. Here I also tried several kinds of colored gesso in the background (including transparent gesso - I wanted to see how it changes the look of the burlap - result: you see a bit of a sheen on the gessoed burlap, the overall appearance gets a bit lighter and - of course - some of the fibers are glued together which somewhat changes the fuzzy texture of the burlap. Maybe by spraying the gesso on the burlap this could be avoided? But it's not a big issue)


I must say I quite liked the result so I made another one. This one has no gesso, but just various kinds of paper collaged on the burlap.

Sunday, November 20, 2005

The first posting

Tataaa... one more blog in the world.

In a way I had a blog for a number of years already, because I kept notes about my training progress in triathlon on my web site. But that was done by hand and very sporadically. Somebody else had to point out to me that this really was a blog.

This blog will be focusing on my progress in art. I plan to keep notes about interesting exhibits or events I went to, but most importantly I want to write about new art I am creating myself. I recently re-designed my art web site and the new design is meant to showcase a collection of particularly interesting work, and work that sort of fits together. Unfortunately that also means that I cannot show interesting little experiments on that site - it just wouldn't fit there. On my old site I had a large collection of "stuff" and I could tell friends to just look at the last page on my art site. With this blog I can do that again and I hope I'll actually post more often and include hopefully interesting notes.

My art web site is here.

Also there is now a cafepress store. It has a couple of my art pieces as Tshirts and cards, but there is also a lot of other stuff, some fun designs for Tshirts that I think will make you laught (or at least smile). Let me know what you think about them!

That's it for tonight. On the next post I'll probably talk about art...