Hail to the potato master!
Today we started working on still lives. An excellent exercise for that is to paint potatoes. Don Feasel pointed at Van Gogh as the true potatoe master and who would argue stepping in VanGogh's footsteps? So potatoes it is. They are actually quite interesting to paint. Don Feasel gave us a really impressive painting demo at the beginning of class where he just whipped out a potato still live in - erm - 10-15 minutes tops. I snapped a few photos along the way and here they are (posted with Don Feasel's permission, of course). At the very bottom of the page you can see the results of my very own efforts of pulling off the same. Of course it took me like 1.5 hours to get to this point, not 10 minutes... (sorry about the inconsistent lighting - I had to take most photos at an awkward angle)
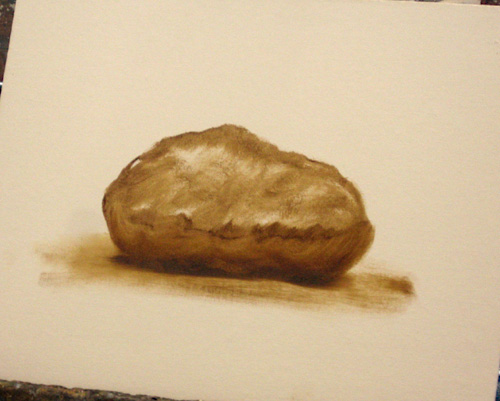
 The key to a still life like this is to realize that there are a number of tricks of the trade. So first you just whip out a potato shape just like that (yeah right, "just like that"). Don't put it too high or too low. Don used relatively short strokes to sketch this thing. It's done mostly in Raw Umber with some white at this point. Then he put in a bit of a shadow. The main danger in this phase is to create a "levitating object". YOu need to ground the thing to keep it put. Another key point at this phase is to not pay too much attention to the object itself, but more to the surroundings. The details of the potato get filled in at the very end - the surroundings count now. Now about that shadow. It sort of works but just not enough. It is really just a rough sketch itself right now.
 We need to make a real shadow. Don makes a relatively brutal stroke over that bottom edge of the potato. I think he even used black for that. Then he starts working the potato back into that black bar. By moving the paint into the black bar you get the right transition between the potato itself and the darkest part of the shadow. The same is used to express roundness of the object: put the darkest parts down first and then manipulate the light colors into that dark area.
 ...as can be seen here. The drop shadow works really well now and the form of the potato is nice and round and much smoother. In a few places, Don set areas of light ochre.
 Now the interesting next step: put a dark background in. In still life this is called a "traditional spanish background". Start more or less with black at the far end and slightly lighten the background towards the object itself. Note that the background can be shown as a line now, because like with the shadow, we'll work the object into the background to create the right transition between object and background. Once that happens, the hardest edge becomes the object edge (see next image). For the horizon line we'll just do a horizontal line. Don't put it too low otherwise the potato will appear to ride like a ship on the horizon.
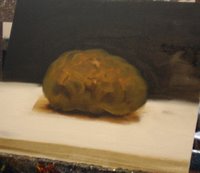 Start building the table top. Essentially Don just put a thick layer of white down and then moved paint from the shadow into the white and the other way round (using a rag). Then also move some value from the side edges towards the object to focus light on it. To make the table be more in the distance, create a table edge in the foreground. To make the edge a bit more interesting, don't keep it a bit varied in value, not all just a stroke of the same color. Continue darkening the background towards black, but also here keep some light around the object to focus attention on it.
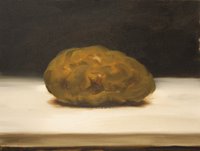 Voila, the final piece. Pretty impressive for 15 or so minutes...
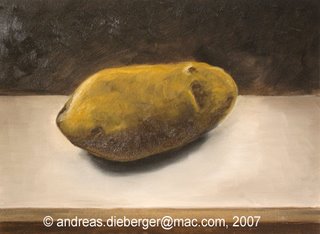
And here is my own piece:
 The key to a still life like this is to realize that there are a number of tricks of the trade. So first you just whip out a potato shape just like that (yeah right, "just like that"). Don't put it too high or too low. Don used relatively short strokes to sketch this thing. It's done mostly in Raw Umber with some white at this point. Then he put in a bit of a shadow. The main danger in this phase is to create a "levitating object". YOu need to ground the thing to keep it put. Another key point at this phase is to not pay too much attention to the object itself, but more to the surroundings. The details of the potato get filled in at the very end - the surroundings count now. Now about that shadow. It sort of works but just not enough. It is really just a rough sketch itself right now.
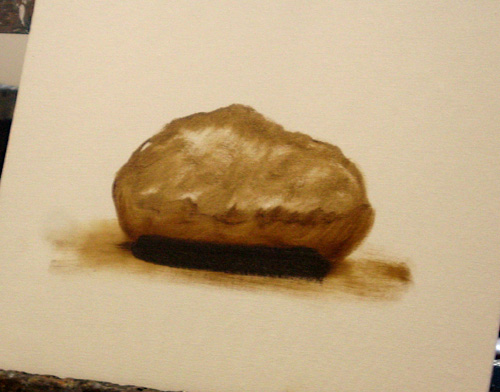 We need to make a real shadow. Don makes a relatively brutal stroke over that bottom edge of the potato. I think he even used black for that. Then he starts working the potato back into that black bar. By moving the paint into the black bar you get the right transition between the potato itself and the darkest part of the shadow. The same is used to express roundness of the object: put the darkest parts down first and then manipulate the light colors into that dark area.
 ...as can be seen here. The drop shadow works really well now and the form of the potato is nice and round and much smoother. In a few places, Don set areas of light ochre.
 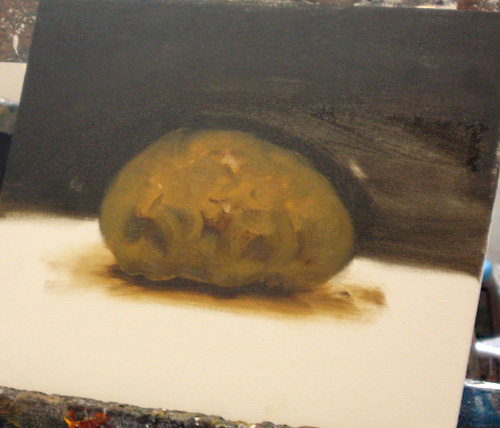 Now the interesting next step: put a dark background in. In still life this is called a "traditional spanish background". Start more or less with black at the far end and slightly lighten the background towards the object itself. Note that the background can be shown as a line now, because like with the shadow, we'll work the object into the background to create the right transition between object and background. Once that happens, the hardest edge becomes the object edge (see next image). For the horizon line we'll just do a horizontal line. Don't put it too low otherwise the potato will appear to ride like a ship on the horizon.
  Start building the table top. Essentially Don just put a thick layer of white down and then moved paint from the shadow into the white and the other way round (using a rag). Then also move some value from the side edges towards the object to focus light on it. To make the table be more in the distance, create a table edge in the foreground. To make the edge a bit more interesting, don't keep it a bit varied in value, not all just a stroke of the same color. Continue darkening the background towards black, but also here keep some light around the object to focus attention on it.
 Voila, the final piece. Pretty impressive for 15 or so minutes...
And here is my own piece:

posted by Andreas at 10:28 PM
![]()

1 Comments:
Your potato looks like it has a little mouth. :)
I wish I was in that class.
Post a Comment
<< Home