Lithography update
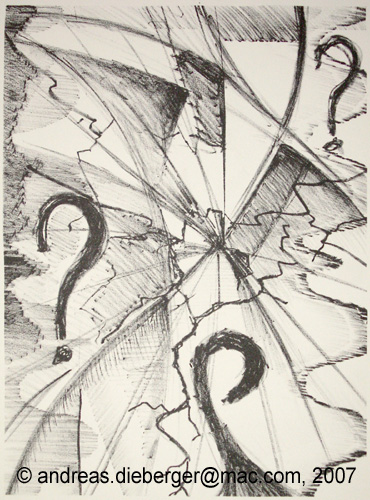
Didn't I say I'm doing painting AND lithography this semester? What happened with that? Well, glad you asked... This week I was finally ready to print something. I was working on two "test plates" for last week or so. I call them test prints because they don't even try to be exciting pieces of art. Rather I'm trying to understand the medium better, and to get a feel for the softness/hardness of the various crayons and pencils, learn to cope with very dark and very light lines etc etc. For that reason my first places are really pretty brutal applications of crayon to get really heavy dark right next to very subtle shades and such... and to hopefully learn how to print these (which is not quite so easy as everybody can tell who has ever tried lithography).
 Also, we are using alumium plates for lithography, not the stones (at least at this point). So that's a slightly new medium for me. I have done litho once before (3 years ago) and then I did work on stone. Also, then I had a master printer help me out with every move which was very convenient. Now I do have some support but in essence I have to do most of the work myself... (how else would I learn it, right?)
So here is the first plate I did. I printed that one on monday and it came out soso. Actually, that print was a total disaster at first. Nothing worked. Till we figured out that my press had waaay too little pressure on (and I just though the weight training had finally paid off). After somebody cranked up the press pressure the last 3 prints came out semi-OK.
As I said, not exactly a great piece of art.
 Now for that second plate I was working on. On this one I pushed the light/dark contrasts even further with fully saturated black and really really light shades done with a #5 litho pencil. And to make things really challenging... I was all by myself when I printed that plate. There was literally nobody else there so I couldn't even ask if I would run into a problem or if I didn't find supplies or whatever. It just had to cope with the situation myself. Well, luckily no emergencies occurred and the print came out quite well, actually. I'm really happy that I succeeded in printing this all by myself (with just the help of one piece of paper - yeah!)
Here is the final result. I printed this one on 4 different paper colors to check a) how consistently I would be able to print this thing (well, semi consistenly would be my assessment of that part) and b) how much paper color would impact the look of the print. And indeed that made quite a difference, especially in the super light shades (see those straight edges in the background. Those were the main challenge so I wouldn't lose those, and at the same time not to totally over-ink the pitch black triangle in the bottom right.
Overall I am very happy with how this print came out and I'm totally jazzed that I went through the whole procedure all by myself (somebody who has never tried lithography probably cannot fully appreciate why I'm so excited about this). Anyway, the next step will be to make actually some interesting print, just an experiment. Stay tuned!
 Also, we are using alumium plates for lithography, not the stones (at least at this point). So that's a slightly new medium for me. I have done litho once before (3 years ago) and then I did work on stone. Also, then I had a master printer help me out with every move which was very convenient. Now I do have some support but in essence I have to do most of the work myself... (how else would I learn it, right?)
So here is the first plate I did. I printed that one on monday and it came out soso. Actually, that print was a total disaster at first. Nothing worked. Till we figured out that my press had waaay too little pressure on (and I just though the weight training had finally paid off). After somebody cranked up the press pressure the last 3 prints came out semi-OK.
As I said, not exactly a great piece of art.
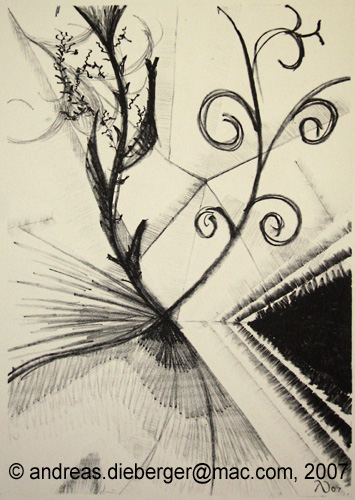 Now for that second plate I was working on. On this one I pushed the light/dark contrasts even further with fully saturated black and really really light shades done with a #5 litho pencil. And to make things really challenging... I was all by myself when I printed that plate. There was literally nobody else there so I couldn't even ask if I would run into a problem or if I didn't find supplies or whatever. It just had to cope with the situation myself. Well, luckily no emergencies occurred and the print came out quite well, actually. I'm really happy that I succeeded in printing this all by myself (with just the help of one piece of paper - yeah!)
Here is the final result. I printed this one on 4 different paper colors to check a) how consistently I would be able to print this thing (well, semi consistenly would be my assessment of that part) and b) how much paper color would impact the look of the print. And indeed that made quite a difference, especially in the super light shades (see those straight edges in the background. Those were the main challenge so I wouldn't lose those, and at the same time not to totally over-ink the pitch black triangle in the bottom right.
Overall I am very happy with how this print came out and I'm totally jazzed that I went through the whole procedure all by myself (somebody who has never tried lithography probably cannot fully appreciate why I'm so excited about this). Anyway, the next step will be to make actually some interesting print, just an experiment. Stay tuned!
posted by Andreas at 10:22 PM
![]()

0 Comments:
Post a Comment
<< Home