My secret garden...?
 Today I reorganized my pretty chaotic collection of recent prints. I put barrier paper between all the prints, I destroyed experimental proofs that really should have been tossed right away and I made information sheets for the major prints I did last year. Work that I had postponed for - well - forever ;)
In that process I also dug up a print I worked on several months ago. I always considered it unfinished because I felt this just needed a third plate printed over it. But I never could quite figure out what that plate would be. One of the ideas was to print a black fence over it, either chain link or boards and there would be just a small gap through which you could see the "garden". I stared at it for a while today and then I decided: "Nope, this thing is simply done" and I signed and numbered the prints, ripped up all the bad tests and proofs, made an info sheet and there we go. As the print was hidden in my flat-file for such a long time I should maybe call it "my secret garden", but in the end I just called it "Garden".
Sizing burlap...
I recently learnt a number of fascinating things about the preparation of fabrics for painting. I was told a traditional receipe for "Kreidegrund" (that's the German term - it roughly translatable as "chalk-ground"). The idea is like this: you stretch your fabric as tight as possible on stretcher bars. Then you size the fabric with rabbit skin glue. To do that you soak the glue crystals over night in water, then you gently heat the mixture to get the sizing. You lightly brush the size over the fabric and let it dry. Then comes the actual ground. The ground is also based on the same glue, but you add some more water and pigment (chalk of champagne and zinc white and/or titanium white). You put a layer of that on the fabric, let it partially dry, put a second layer on, let it dry (about 2 days). Then you can slightly seal the thing with a very diluted dammar varnish to control just how absorbent this ground will be (chalk grounds tend to be quite absorbant). So far so good. But then I learned a loooot more:
a) Such a ground is actually not quite so great for priming flexible fabrics, because it is relatively brittle. It's close to traditional gesso, which really should be used on rigid supports, that is on panels. Indeed, some of the canvases I prepared did develop little cracks when they stuck to the stretcher bars and I tried to gently unstick them. The receipe I described is probably less brittle than true gesso (based on gypsum) but definitely not as flexible as acrylic "gesso" (I put gesso under quotes because what you can find in the art supply store under the title of "gesso" really doesn't have much to do with traditional gesso. For more info see the excellent info on the gamblin web site.
b) A major problem with rabbit skin glue is that it expands and shrinks depending on humidity. Which again leads to cracks in the ground. Not good. But - and now it gets interesting - there is also a big advantage of the shrinking of the rabbit skin glue: once you size the fabric with the glue and it dries it tightens the fabric a lot and a loosely stretched canvas suddenly becomes tight as a drum.
Hmmm... Now let's fast-forward to my own pieces. If you looked at my site you will have noticed that I like to paint on burlap. Most burlap has a very open weave. Sooo? Well, I was always wondering: "What's really the purpose of the sizing?" I always thought the main reason was that the fabric just pulls the oil out of the paint layer and then the paint film becomes dull, which is not good, of course. But I recently learnt that linseed oil (maybe because of its acidity?) actually damages and eventually destroys the fibers of the canvas! So you need to protect the fabric from the oil. Yes, you also want to keep the oil in the paint film, but the damage to the support fabric is the more serious problem. If your painting turns matte you can always oil it out, after all.
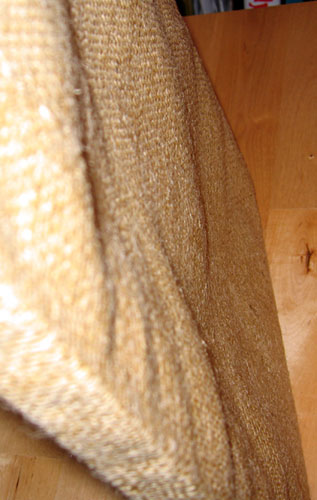
Back to the burlap pieces... if you use regular canvas, you have a pretty tight weave and a layer of size actually protects your canvas from the oil. But in a really open weave like in burlap, paint can actually get through the weave to the back of your piece and - guess what - the sizing is only on one side of the burlap and the back of your piece is not protected against the oil... Oops! Indeed, with a technique like I use on the burlap pieces, oil paint gets rubbed into the fabric and does sometimes get squeezed through the burlap to the back of the painting. Therefore, if the sizing is supposed to protect the fabric, you need to size the burlap on both sides! The photo on the side shows the back of one of my recent pieces. It's very obvious that the paint does indeed get squeezed through the wide weave on the back of the painting.
 (Side note: Now I should mention here that this doesn't mean that this piece will fall apart in a couple of months! Even with some paint on the unsized back it will probably last for a few decades if kept well. But... it might not last a century. Well, who knows if whoever owns the piece hasn't tossed it into the fire by then anyway, but, but, but as an artist you should always try to practice good craftmanship and make sure your piece has the potential to last a long time. Just in case. People who buy your piece expect good workmanship and this is just one aspect of that, I think. And of course most artist secretly hope that one of their pieces will end up in some museum some 500 years in the future.)
Back to the sizing... As I wrote above, there is the issue with the rabbit skin glue being hygroscopic and expanding / shrinking with humidity. For that reason many people don't use traditional rabbit skin glue for sizing any more but more modern materials, such as PVA size. Fabric primed with PVA size does not tighten when it dries.
Now the big question: how do you best size fabric on both sides? According to the instructions on the bottle of PVA size I bought you should tightly stretch the canvas *before sizing* (of course, because it won't stretch by itself afterwards). Eeerrrmmm...? in my case this would mean: stretch, size, let dry, take off, turn around restretch, re-size? Or maybe I can size one side, quickly stretch it and then size the other? Or I could size both sides and then quickly stretch it? Questions over questions... Obviously it's time for an experiment. For this purpose I used small frames (11x14 inches) and to make sure it wouldn't get too easy I used pieces of burlap that were actually a bit smaller than they should be (harumph).
I took two pieces and I sized one side and then quickly stretched it on the canvas. Then sized the second side. On two other pieces I sized both sides and then stretched them. It was a very sticky business but it worked beautifully, and the burlap actually tensed up a bit and was tight light a drum. I sat down and had hot chocolate to celebrate.

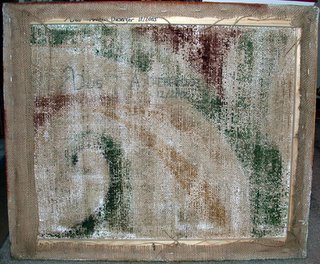
...fast forward 2 hours... Argh!!! Unfortunately, the instructions on the bottle ARE correct: the fabric indeed does NOT tighten with this sizing. It tightens a bit at first, but then it actually slackens again!! As you can see on the photo the burlap is soo loose it is impossible to paint on it. Therefore my technique of sizing both sides absolutely does NOT work. I will have to take out the staples on two sides and restretch all four frames. Or - maybe even better - totally take the burlap off and restretch them.
I guess I have to think of a better solution. One possibility is to just lightly stretch the burlap on the board with a few staples, size it and let it dry. Then stretch it on stretcher bars such that the sized size is on the back. THEN size fabric stretched on the bars including the sides of the frame. That's what I will try next. I expect it to be more difficult than stretching unsized burlap because the fabric is a bit harder and less flexible after it has been sized. I'll add a note to this posting when I had a chance to try that.
PS: You might have noticed there is another very unresolved issue left... how will I actually prime the burlap once it is sized? Because the "Kreidegrund" is also based on rabbit skin glue, right? So the problem of the ground shrinking and expanding with humidity is only partially solved. Stay tuned as I keep researching...
 Today I reorganized my pretty chaotic collection of recent prints. I put barrier paper between all the prints, I destroyed experimental proofs that really should have been tossed right away and I made information sheets for the major prints I did last year. Work that I had postponed for - well - forever ;)